Happy Monday everyone. How are you? You okay? Is it paw-sible that you are looking for a new pattern today? I’ve got a brand new FREE pattern for you today in that I’ve collaboration with the lovely folks from Anchor Yarns. Put a zing into Spring with a new pretty pattern; allow me to introduce Periwinkle the Puppy!
Periwinkle the playful Puppy has been in the flower bed again! She’s always willing to help pitch in with some Spring gardening!
I always associate spring with flowers like daffodils, periwinkles, bluebells, crocuses and tulips, I love that they are a sign of us bidding winter goodbye with some lovely cheerful colour, and are a hopeful sign of brighter nights and warmer days to come.
We’ve officially started Spring 2021 here in the UK and designing this puppy felt like a lovely springtime project to work on. I had a blast making this puppy and I hope you will enjoy making it too.
Made in the pretty pastels colours of the gorgeous Anchor Organic Cotton, I think this soft and cuddly puppy will quickly become your new best friend.
Anchor Organic Cotton is brand new yarn, and I was very excited to get to play with it. It’s 100% cotton 4-ply yarn which is unmercerised (meaning it has a matt finish) which I combined with a with a 3mm hook (approx. US size D/3), for this project. It comes in 20 beautiful shades (of which I used 6 for my puppy project), all inspired by nature and created with vegetable based dyes and for cotton it’s really nice and soft to work with.
What I also really liked about this yarn is how eco friendly it is, it’s a perfect yarn for conscious crafters who care about the environment as it’s ecological and social criteria, is backed up by independent certification (GOTS) of the entire textile supply chain.
Periwinkle the Puppy pattern uses simple stitches throughout making it a great amigurumi project for a beginner. You can pick it up as a free download available directly from the Anchor Yarns website where you can just download the pattern or register for an account. It doesn’t cost anything for an account, but by signing up you’ll gain access to loads of other free patterns by other talented designers too.
The pattern is written in UK crochet terminology with the usual explanation of stitches and techniques I’ve used in the design.
If you hook up the Periwinkle the Puppy I hope you’ll tag @kcaco.uk on Instagram using the hashtags #kcacouk and #proud2craft or #anchoryarns (so the folks at Anchor Yarns can see too) or share your projects in my Facebook group as I love to see your finished work!
Until next time folks! Happy hooking and keep calm and crochet on my friends xx
Please note that some of the links in my blog are affiliate links. I may earn a small commission if you purchase via these links, but the price you pay is not affected, thank you for your support.
Squuueeee!! I’ve got a pattern in a book! In an actual physical little book! Whilst you may not be quite as delighted as I am, I’m hoping you’ll love the design I’ve come up with.
Wool on the Exe is a yarn store in Devon that brings local knitters together to socialise and make items for charity. They specialise in beautiful British yarns, especially those produced locally in Devon and Cornwall.
Back in April / May time whilst lockdown was going on here in the UK I saw a call out for submissions for, either local designers or designers inspired by Devon and the surrounding area, to come up with something that might be suitable to appear in a book they were putting together.
Well I do love a bit of a suggestive brief, and as a family we’ve enjoyed many happy holidays down in that part of the world, so I felt inspired to submit an idea – which was then excitingly accepted.
The Iska Mitts were inspired by the River Exe, which flows along the length of Devon, and whose name derives from ‘Iska’ meaning ‘water’ or ‘abounding in fish’.
The fingerless mitts are worked in textured crochet stitches that represent the movement of water and waves. The pattern starts with the cuff, worked flat and then joined. The hand is then picked up from the cuff and worked in the round with thumb gusset shaping and I’ve included two sizes for medium or larger hands. I would say that this is an easy to make fingerless mitt pattern suitable for advanced beginners.
I used a new yarn to me called Fyberspates Vivacious DK which is a robust high twist 100% Merino wool! When you say merino I always think it’s going to be gorgeous and it was, and for a hand dyed yarn it’s really robust, you can machine wash it (which is a bonus in my book).
The double knit (light worsted) yarn comes in a proper twisted skein and the colourway I used for the Iska Mitts was called Denim (Shade 831) which, as you can imagine, is a mixture of dark and mid blues reminiscent of denim jean.
Now it just so happens that I’ve recently reached the milestone of 4K followers on Instagram so I’ve decided, to coincide with the launch of the book, to do a giveaway of a copy of the book over on Instagram.
I’m waiting for my copy of the book but when I receive it I’m going to take a photo for the giveaway, just so you can see it but I’m keeping that copy, what I’ll do is purchase a new copy and get it sent directly from Wool on the Exe directly to the winners door – so make sure you look out for that giveaway coming soon!
But if you can’t wait until then the book costs £12 and contains a collection of eight knitting patterns, five crochet patterns, two needle-felting tutorials, an essay, and a recipe. Handily purchase of the print book will also include a download code for a digital PDF version too.
As always if you hook up the Iska Mitts I hope you’ll tag kcaco.uk and woolontheexe on Instagram or share your projects in my Facebook group as we’d love to see your finished work!
Until next time folks! Happy hooking, keep calm and crochet on my friends xx
Happy work in progress Wednesday everyone. How are you? You okay?
I wanted to share with you today something I’ve recently finished. In collaboration with the lovely folks from Anchor Yarns, I’ve got a brand new FREE angel pattern for you.
Please allow me to introduce the Anchor Angel Amigurumi which is available to download for FREE from the Anchor website (see link below).
I used Creativa Fino 4ply, with a 3mm hook (approx US size D/3), for this project. I’ve used Creativa Fino for several projects now and really enjoy working with it. If you are not familiar with the yarn it’s 100% twisted mercerised cotton which comes in 50g balls (125m) and is perfect for making crochet toys. I also combined it with some of Anchors metallic yarn for the halo and the wings, which just added that perfect bit of sparkle!
When I finished making the angel it was actually unseasonably bright and sunny! I wanted to create a bit of a hygge type of cosy season Christmas scene to have a photo shoot with. Then I remembered that I’d bought some awesome tiny LED fairy lights from Amazon. They worked just how I wanted them too when I added them to an old coffee jar, just adding a nice bit of twinkly light.
The Anchor Angel Amigurumi pattern uses simple stitches throughout making it a great amigurumi project for a beginner. You can pick it up as a free download available directly from the Anchor Yarns website where you can just download the pattern or register for an account. It doesn’t cost anything for an account, but by signing up you’ll gain access to loads of other free patterns by other talented designers too.
The pattern is written in UK crochet terminology and I’ve linked it up on Ravelry too if you’d like to save it to your favourites on there (at the link below).
Apart from a beautiful tree topper I think she would make a great holiday gift or maybe even a table top decoration.
If you hook up the Anchor Angel Amigurmi I hope you’ll tag @kcaco.uk on Instagram using the hashtags #kcacouk and #proud2craft or #anchoryarns (so the folks at Anchor Yarns can see too) or share your projects in my Facebook group as I love to see your finished work!
Until next time folks! Happy hooking and keep calm and crochet on my friends xx
Please note that some of the links in my blog are affiliate links. I may earn a small commission if you purchase via these links, but the price you pay is not affected, thank you for your support.
Edited: This post was originally published in 2020 and updated in March 2026. Broken links have been removed. You can view the free pattern here.
It’s free pattern Friday – woo hoo! And in collaboration with the lovely folks from Anchor Yarns I’ve got a brand new pillow pattern to offer you. Please allow me to introduce the Perfect Puff Pillow which is available to download for FREE from the Anchor website (see link below). view on this blog.
I wanted to create a classic contemporary looking pillow in a solid colour with lovely texture so that crafters could match it to their own decor – though you could totally mix and match the colours of the motifs to create something totally unique!
I used Creativa Fino 4ply for this project, which comes in a fabulous range of shades for beautifully coloured homeware. It’s 100% twisted cotton which is lovely and soft and has a silky feel – and it gives stitch definition to drool over!
I used a 3.25mm hook (US size D/3) to create the pillow which measures 35 x 50cm (14 x 20 inches) making it a perfect accent pillow size. I used a cushion inner from Amazon for my centre and a 30cm zip that I had in my craft cupboard – similar to this one.
This pattern uses simple stitches throughout making it a great project for a beginner – but it has enough interest for an intermediate crocheter. Motifs make great projects to work on in between other projects when you just want to work on something quick, and they’re small enough to to enjoy when you are out and about for a project on the go. The finished cushion also has a gorgeous texture that you just want to run your fingers over.
The pattern is written in UK and US crochet terminology and I’ve linked it up on Ravelry too if you’d like to save it to your favourites on there (at the link below).
It’s a simple modern pillow which I think would make the perfect addition to any bedroom, dorm room, or comfy couch. What colour would you make yours in?
If you hook up the Perfect Puff Pillow I hope you’ll tag @kcaco.uk on Instagram using the hashtags #kcacouk or share your projects in my Facebook group as I love to see your finished work!
Until next time folks! Happy hooking and keep calm and crochet on my friends xx
As Coronavirus sweeps across the UK, many people have responded by putting rainbow pictures in their windows. The rainbows have come to represent “positivity, hope and togetherness” during the pandemic. Today’s free blanket pattern not only take inspiration from that but also in the simple joys that a rainbow brings any time you see one.
It’s been a while since I shared a free pattern for you here on the blog, and I wanted todays blanket to be something positive that came from the lockdown, something that you could enjoy making, and maybe look forward to gifting to others after lockdown is over.
During the pandemic I found myself looking for nice mindful patterns, where I could keep my hands busy and just lose myself in the stitches. Sometimes you just find a stitch pattern that you just enjoy making and for me that’s definitely the box stitch.
I think it might be known as other names, but to me it looks like rows of little boxes when put together.
Worked in double knit this lightweight blanket is easy to memorise making it a perfect pattern for relaxing hooky time! I made my blanket from some Scheepjes Colour Crafter that I’d got in my stash.
The following pattern is free here on the blog but it’s also available in my Ravelry, Etsy or LoveCrafts stores where there is a nominal fee for a downloadable 3 page PDF pattern free of advertisements if you’d prefer. The PDF download is available in UK or US crochet terminology.
Oh and if you enjoy making this box stitch blanket then you may also enjoy the ‘Don’t Box Me In’ blanket I designed for Dear Ewe which features the same stitch. You can pick up that free pattern over on the Dear Ewe blog.
Boxing Rainbows Blanket
MATERIALS Yarn: 8ply / yarn weight #3 100g / 300m White 25g / 75m Red 25g / 75m Orange 25g / 75m Yellow 25g / 75m Green 25g / 75m Blue 25g / 75m Indigo 25g / 75m Violet 25g / 75m Pink Scheepjes Colour Crafter in Weert (1001), Amsterdam (1010), Gent (2002), Leuven (2008), Terneuzen (1821), Knokke (2012), Brugge (2003), Drachten (1827), Luik (2006) used in photos. You will also need: Scissors A yarn needle
Hook: 4mm (US Size G/6) Gauge: 2 clusters= 3.5cm / 1.37” Obtaining the correct gauge is not critical to this project but if your gauge does not match then your finished item will be a different size. Pattern will work in other hooks and yarns though finished size will be different. Finished Size: 86cm (33.8”) long x 68cm (26.7”)
ABBREVIATIONS: UK TERMS st(s) stitch(es) sl st slip stitch ch(s) chain dc double crochet tr treble crochet RS right side
STITCH GUIDANCE Slip Stitch (sl st): Insert hook in st indicated, yarn over and draw through all loops. Double Crochet (dc): Insert hook in st indi-cated and pull up a loop (two loops on hook), yarn over, pull through both loops on hook. Treble Crochet (tr): Yarn over, insert hook in indicated st and pull up a loop (three loops on hook), yarn over, pull through two loops, yarn over, pull through remaining two loops on hook. Cluster (Cl): Three treble crochets worked in a ch3-sp
PATTERN NOTES Make the blanket bigger or smaller by making the beginning chain in a multiple of 3+5 (stitch counts in the pattern are for the blanket size specified on page 1) A ch3 at the start of a row counts as a st
PATTERN Row 1: (RS) With Pink; ch43, 1tr in the 4th ch from hook, 1tr in each st along until end, turn. 41sts Row 2: Ch1, (1dc in-between the first 2trs of previous row, ch3, miss 3sts, 1dc in-between the next 2trs of row 1) repeat across until end, turn. 14dc + 13 x ch3-sps Row 3: Ch3, (miss the next dc, 1Cl in the next ch3-sp) repeat across until the last st, 1tr in the last st, turn. 41sts / 13 clusters + 1tr at either end of row. Rows 4 – 5: Repeat rows 2 and 3. Fasten off Pink and weave in ends. Row 6: Attach White, in-between the first 2trs of previous row with a sl st. Ch1, (1dc in-between the first 2trs of row 1, ch3, miss 3sts, 1dc in-between the next 2trs of row 1) repeat across until end, turn. Rows 7 – 9: Repeat alternate rows of 3 and 2 for the pattern. Fasten off White and weave in ends. Row 10: Attach Violet, in-between the first 2trs of previous row with a sl st. Ch1, (1dc in-between the first 2trs of row 1, ch3, miss 3sts, 1dc in-between the next 2trs of row 1) repeat across until end, turn. Rows 11 – 15: Repeat alternate rows of 3 and 2 for the pattern. Fasten off Indigo and weave in ends. Row 16: Attach White, in-between the first 2trs of previous row with a sl st. Ch1, (1dc in-between the first 2trs of row 1, ch3, miss 3sts, 1dc in-between the next 2trs of row 1) repeat across until end, turn. Rows 17 – 19: Repeat alternate rows of 3 and 2 for the pattern. Fasten off White and weave in ends. Row 20: Attach Indigo, in-between the first 2trs of previous row with a sl st. Ch1, (1dc in-between the first 2trs of row 1, ch3, miss 3sts, 1dc in-between the next 2trs of row 1) repeat across until end, turn. Rows 21 – 25: Repeat alternate rows of 3 and 2 for the pattern. Fasten off Indigo and weave in ends. Row 26: Attach White, in-between the first 2trs of previous row with a sl st. Ch1, (1dc in-between the first 2trs of row 1, ch3, miss 3sts, 1dc in-between the next 2trs of row 1) repeat across until end, turn. Rows 27 – 29: Repeat alternate rows of 3 and 2 for the pattern. Fasten off White and weave in ends. Row 30: Attach Blue, in-between the first 2trs of previous row with a sl st. Ch1, (1dc in-between the first 2trs of row 1, ch3, miss 3sts, 1dc in-between the next 2trs of row 1) repeat across until end, turn. Rows 31 – 35: Repeat alternate rows of 3 and 2 for the pattern. Fasten off Blue and weave in ends. Row 36: Attach White, in-between the first 2trs of previous row with a sl st. Ch1, (1dc in-between the first 2trs of row 1, ch3, miss 3sts, 1dc in-between the next 2trs of row 1) repeat across until end, turn. Rows 37 – 39: Repeat alternate rows of 3 and 2 for the pattern. Fasten off White and weave in ends. Row 40: Attach Green, in-between the first 2trs of previous row with a sl st. Ch1, (1dc in-between the first 2trs of row 1, ch3, miss 3sts, 1dc in-between the next 2trs of row 1) repeat across until end, turn. Rows 41 – 45: Repeat alternate rows of 3 and 2 for the pattern. Fasten off Green and weave in ends. Row 46: Attach White, in-between the first 2trs of previous row with a sl st. Ch1, (1dc in-between the first 2trs of row 1, ch3, miss 3sts, 1dc in-between the next 2trs of row 1) repeat across until end, turn. Rows 47 – 49: Repeat alternate rows of 3 and 2 for the pattern. Fasten off White and weave in ends. Row 50: Attach Yellow, in-between the first 2trs of previous row with a sl st. Ch1, (1dc in-between the first 2trs of row 1, ch3, miss 3sts, 1dc in-between the next 2trs of row 1) repeat across until end, turn. Rows 51 – 55: Repeat alternate rows of 3 and 2 for the pattern. Fasten off Yellow and weave in ends. Row 56: Attach White, in-between the first 2trs of previous row with a sl st. Ch1, (1dc in-between the first 2trs of row 1, ch3, miss 3sts, 1dc in-between the next 2trs of row 1) repeat across until end, turn. Rows 57 – 59: Repeat alternate rows of 3 and 2 for the pattern. Fasten off White and weave in ends. Row 60: Attach Orange, in-between the first 2trs of previous row with a sl st. Ch1, (1dc in-between the first 2trs of row 1, ch3, miss 3sts, 1dc in-between the next 2trs of row 1) repeat across until end, turn. Rows 61 – 65: Repeat alternate rows of 3 and 2 for the pattern. Fasten off Orange and weave in ends. Row 66: Attach White, in-between the first 2trs of previous row with a sl st. Ch1, (1dc in-between the first 2trs of row 1, ch3, miss 3sts, 1dc in-between the next 2trs of row 1) repeat across until end, turn. Rows 67 – 69: Repeat alternate rows of 3 and 2 for the pattern. Fasten off White and weave in ends. Row 70: Attach Red, in-between the first 2trs of previous row with a sl st. Ch1, (1dc in-between the first 2trs of row 1, ch3, miss 3sts, 1dc in-between the next 2trs of row 1) repeat across until end, turn. Rows 71 – 75: Repeat alternate rows of 3 and 2 for the pattern. Fasten off Red and weave in ends. You will now need to rotate your work to the right so you can continue working on the long edge of the RS of your work. Row 76: Attach White to the post of the 1tr of row 75, Ch3, 3tr in the first sp, then work a Cl in the tr post sp of each row along until the last tr last dc (of row 1), then work 4tr in the last sp, turn. 38 clusters + 2 x 1trs at the end of each row / 116sts Rows 77 – 78: Repeat alternate rows of 2 and 3 for the pattern. Fasten off White and weave in ends. Row 79: Attach Blue, in-between the first 2trs of previous row with a sl st. Ch1, (1dc in-between the first 2trs of row 1, ch3, miss 3sts, 1dc in-between the next 2trs of row 1) repeat across until end, turn. Rows 80 – 84: Repeat alternate rows of 3 and 2 for the pattern. Fasten off Blue and weave in ends. Row 85: Attach White, in-between the first 2trs of previous row with a sl st. Ch1, (1dc in-between the first 2trs of row 1, ch3, miss 3sts, 1dc in-between the next 2trs of row 1) repeat across until end, turn. Rows 86 – 88: Repeat alternate rows of 3 and 2 for the pattern. Fasten off White and weave in ends. Row 89: Attach Indigo, in-between the first 2trs of previous row with a sl st. Ch1, (1dc in-between the first 2trs of row 1, ch3, miss 3sts, 1dc in-between the next 2trs of row 1) repeat across until end, turn. Rows 90 – 94: Repeat alternate rows of 3 and 2 for the pattern. Fasten off Indigo and weave in ends. Row 95: Attach White, in-between the first 2trs of previous row with a sl st. Ch1, (1dc in-between the first 2trs of row 1, ch3, miss 3sts, 1dc in-between the next 2trs of row 1) repeat across until end, turn. Rows 96 – 98: Repeat alternate rows of 3 and 2 for the pattern. Fasten off White and weave in ends. Row 99: Attach Violet, in-between the first 2trs of previous row with a sl st. Ch1, (1dc in-between the first 2trs of row 1, ch3, miss 3sts, 1dc in-between the next 2trs of row 1) repeat across until end, turn. Rows 100 – 104: Repeat alternate rows of 3 and 2 for the pattern. Fasten off Violet and weave in ends. Row 105: Attach White, in-between the first 2trs of previous row with a sl st. Ch1, (1dc in-between the first 2trs of row 1, ch3, miss 3sts, 1dc in-between the next 2trs of row 1) repeat across until end, turn. Rows 106 – 108: Repeat alternate rows of 3 and 2 for the pattern. Fasten off White and weave in ends. Row 109: Attach Pink, in-between the first 2trs of previous row with a sl st. Ch1, (1dc in-between the first 2trs of row 1, ch3, miss 3sts, 1dc in-between the next 2trs of row 1) repeat across until end, turn. Rows 110 – 114: Repeat alternate rows of 3 and 2 for the pattern. Fasten off Pink and weave in ends. You will now need to rotate your work to the right again so you can continue working on the other long edge of the RS of your work. Row 115: Attach White to the post of the 1tr of row 75, Ch3, 3tr in the first sp, then work a Cl in the tr post sp of each row along until the last tr last dc (of row 1), then work 4tr in the last sp, turn. 38 clusters + 2 x 1trs at the end of each row / 116sts Rows 116 – 117: Repeat alternate rows of 2 and 3 for the pattern. Fasten off White and weave in ends. Row 118: Attach Green, in-between the first 2trs of previous row with a sl st. Ch1, (1dc in-between the first 2trs of row 1, ch3, miss 3sts, 1dc in-between the next 2trs of row 1) repeat across until end, turn. Rows 119 – 123: Repeat alternate rows of 3 and 2 for the pattern. Fasten off Green and weave in ends. Row 124: Attach White, in-between the first 2trs of previous row with a sl st. Ch1, (1dc in-between the first 2trs of row 1, ch3, miss 3sts, 1dc in-between the next 2trs of row 1) repeat across until end, turn. Rows 125 – 127: Repeat alternate rows of 3 and 2 for the pattern. Fasten off White and weave in ends. Row 128: Attach Yellow, in-between the first 2trs of previous row with a sl st. Ch1, (1dc in-between the first 2trs of row 1, ch3, miss 3sts, 1dc in-between the next 2trs of row 1) repeat across until end, turn. Rows 129 – 133: Repeat alternate rows of 3 and 2 for the pattern. Fasten off Yellow and weave in ends. Row 134: Attach White, in-between the first 2trs of previous row with a sl st. Ch1, (1dc in-between the first 2trs of row 1, ch3, miss 3sts, 1dc in-between the next 2trs of row 1) repeat across until end, turn. Rows 135 – 137: Repeat alternate rows of 3 and 2 for the pattern. Fasten off White and weave in ends. Row 138: Attach Orange, in-between the first 2trs of previous row with a sl st. Ch1, (1dc in-between the first 2trs of row 1, ch3, miss 3sts, 1dc in-between the next 2trs of row 1) repeat across until end, turn. Rows 139 – 143: Repeat alternate rows of 3 and 2 for the pattern. Fasten off Orange and weave in ends. Row 144: Attach White, in-between the first 2trs of previous row with a sl st. Ch1, (1dc in-between the first 2trs of row 1, ch3, miss 3sts, 1dc in-between the next 2trs of row 1) repeat across until end, turn. Rows 145 – 147: Repeat alternate rows of 3 and 2 for the pattern. Fasten off White and weave in ends. Row 148: Attach Red, in-between the first 2trs of previous row with a sl st. Ch1, (1dc in-between the first 2trs of row 1, ch3, miss 3sts, 1dc in-between the next 2trs of row 1) repeat across until end, turn. Rows 149 – 153: Repeat alternate rows of 3 and 2 for the pattern. Fasten off Red and weave in ends.
I’m delighted to say that I’ve got another FREE pattern lined up for you today in collaboration with the lovely folks from Anchor Yarns. I’ve created a sweet new baby blanket with their Baby Pure Cotton yarn.
So without further ado allow me to introduce the XOXO Baby Blanket which is available for FREE from the Anchor website (see link below).
Baby Pure Cotton yarn is 100% cotton which is combed and not mercerised. It’s available in 24 soft powdered shades but I just used shade 00402 which is a lovely muted mushroom colour.
The yarn is ideal for babies as it’s hypoallergenic and saliva resistant to be entirely safe for the new-born. It’s also delicate and soft so very kind and gentle for babies sensitive skin. It’s also suitable to machine wash up to 60°C which is great for a baby blanket.
I used a 3.5mm hook (US size E/4) to create a square baby blanket which measures 76cm x 76cm (30 x 30 inches) which is perfect for Perfect for sleeping, cuddling or as a stroller cover.
I wanted to create something in a single block neutral colour so that crafters could imagine re-creating it in their own favourite shades – though you could totally mix and match the colours of the motifs to create something totally unique!
This pattern uses simple stitches throughout and has a nice texture whilst still having enough stitches to create a warm blanket. I’m a big fan of the popcorn stitch as it just creates such a wonderful texture that you just want to run your fingers over!
The XOXO Baby Blanket is a free download available directly from the Anchor Yarns website where you can just download the pattern or register for an account. It doesn’t cost anything for an account, but by signing up you’ll gain access to loads of other free patterns by other talented designers too.
The pattern is written in UK crochet terminology and I’ve linked it up on Ravelry too if you’d like to save it to your favourites on there (at the link below).
This blanket would be a great project for a beginner, or an intermediate crocheter. When you’re just learning to crochet, the thought of completing a whole blanket might seem impossible, let alone making an entire crochet blanket, but by working in smaller square motifs it breaks down the larger project into manageable chunks.
You could also easily make this blanket bigger by just increasing the number of square motifs you start with.
If you are looking for a few more FREE patterns, by me, using Anchor Yarns check out the following links:
If you hook up the XOXO Baby Blanket I hope you’ll tag @kcaco.uk on Instagram using the hashtags #kcacouk and #proud2craft or #anchoryarns (so the folks at Anchor Yarns can see too) or share your projects in my Facebook group as I love to see your finished work!
Until next time folks! Happy hooking and keep calm and crochet on my friends xx
It was a pleasure to be contacted, at the end of last year, by the lovely folks at Anchor Yarns to see if I wanted to try out some of their new Freccia yarn in some brand new colours.
Using five different shades of Freccia yarn I’ve put together a fun fashion scarf which is perfect for spring and summer accessorising. Allow me to introduce the Freccia Flor Scarf which is available for FREE from the Anchor website (see link below).
Freccia yarn is a high quality twisted mercerised cotton which is a structured yet flexible yarn that’s available in a range of bright colours. It comes in 6 different thread thicknesses, the thinnest thickness is Nº 20 and the thickest is Nº 6, but it was the 3ply (No. 6) that I got to play with in the 50g balls.
The yarn is ideal for fashion wear because it’s fine but strong, it can be washed with hot water in the washing machine up to 95ºC and you can potentially iron it at a high temperature.
I used a 3mm hook ( roughly equivalent to a US size D3) to create this scarf which measures 160cm long x 15cm wide (63 inches long x 6 inches wide). The perfect length for a carefree look wrapped around your neck with the loose beaded flowery ends hanging down in front.
I wanted to create something that was pretty and feminine and with it’s simple crochet pattern, for the main body of the scarf, it’s a very mindful project which I enjoyed making.
Finally I encorporated beads onto the fringe to add weight to each end of the scarf. The scarf really benefits from having the extra substance to the fringe to allow gravity to help keep it in perfect shape and drape – and who can resist an extra bit of bling (not me)!
I’m not going to lie it does take a while to add the beads, but it’s so worth it in the end, it adds a wonderfully tactile finish; it’s so lovely to run your fingers through the fringing when you’re wearing the scarf!
Scarves, like the Freccia Flor, are the perfect way to introduce colour to an otherwise plain outfit and you could repeat the pattern in a variety of different colours – I think a grey main colour and an ombre effect of pink flowers would look particularly nice for instance.
The Freccia Flor Scarf is a free download available directly from the Anchor Crafts website here where you can just download the pattern or register for an account. It doesn’t cost anything for an account, but by signing up you’ll gain access to loads of other free patterns by other talented designers too.
The pattern is written in UK crochet terminology and I’ve linked it up on Ravelry too if you’d like to save it to your favourites on there (at the link below).
This pattern is perfect for beginners, as it only uses simple stitches, or for anyone that just wants a fancy scarf to add to their accessories.
If you hook up the Freccia Flor Scarf I hope you’ll tag @kcaco.uk on Instagram using the hashtags #kcacouk or #frecciaflor and #proud2craft or #anchoryarns (so the folks at Anchor Yarns can see) or share your projects in my Facebook group as I love to see your finished work!
Until next time folks! Happy hooking and keep calm and crochet on my friends xx
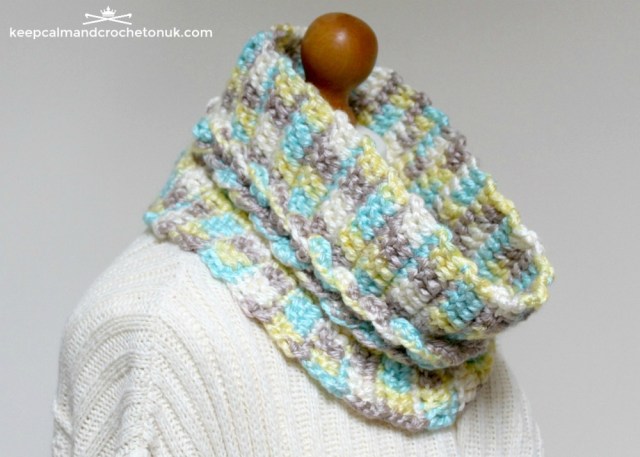
Looking for some projects that are fast and rewarding? I’ve got a series of new one-ball crochet patterns out now in the I Like Crochet Collections. Including a cowl, a Tunisian crochet glasses case and some cute baby booties!
If you’ve not heard of I Like Crochet Collections before it’s part of the I Like Crochet Network for crochet enthusiasts, and the same people that publish the popular I Like Crochet e-magazine. Based in the US the patterns on the site are written in US terminology, but if you are happy to convert patterns then there’s a wealth of designs (and great designers).
Now do you have a ball of chunky weight yarn sadly languishing in your stash and you don’t know what to make with it? Then how about the Colbie Cowl…
This simple cowl takes advantage of a fun stitch and lets the yarn do the rest of the talking! It’s great for variegated yarn for a subtle finish or you could go bold with a block colour to create a real statement piece.
You can find this cowl under collections in the One Skein Collection, it’s a great project for beginners and a fast make for more experienced crocheters!
I loved the challenge of coming up with some patterns that use one ball of yarn or less! I also created the Siesta Sunglasses Case available in The Beach Collection. This fun little case is worked in Tunisian crochet which makes it the perfect sunglasses protector at the beach.
The tight stitches paired with its drawstring closure ensure your sunnies stay safe and sand free! I always forget how I enjoy working on a Tunisian Crochet project until I do it! Do you like Tunisian crochet? I feel like I’ve got lots more to discover there…
And finally, my favourite of the collections, are the Sleepy Unicorn Booties which are part of the The Best Baby Crochet Patterns Collection. My brother had not long had a new baby girl and she was definitely the inspiration behind these.
I wanted to create something cute and girly – and with the sleepy little eyes, golden horns and pastel manes, these booties are irresistible to make and so much fun to give!
The collections are currently exclusive to the I Like Crochet Network, there are various sign up options (and they often have special subscriptions offers) that you can learn more here.
Until next time folks! Happy hooking, keep calm and crochet on my friends xx
Issue 43 of Crochet Now magazine is out now and I’ve got a brand new pattern inside. This month’s issue is themed around day tripping, staycations in the country or trips to the seaside – anywhere where you can take your crochet with you. So I came up with a fun little portable project that you can wear when you get there!
Allow me to introduce the Top of the Knot’s Headband – the perfect way to stay ahead of the trend! A headband is a great understated accessory that can top off any outfit – and as a bonus also keeps the wind from blowing your hair in your face.
It was nice to make something a little different, as I’ve been making a lot of amigurumi’s lately, and this intermediate design worked back and forth in rows was a nice change from working in the round!
I used Scheepjes Linen Soft to make the headband which is a gorgeous blend of cotton, linen and acrylic which makes it a great choice for crocheting in the summer. It’s a lovely light yarn too which means you won’t get hot wearing it in the sunshine and it works up quick too.
There are loads of different colours (33 in total) of Scheepjes Linen Soft so you can totally make an accessory to match your outfit! Teamed up with a large pair of sunglasses you’ll look fabulous darling! Nobody should look plain whilst tanning on the beach! Though I love how the magazine have styled it too with the denim jacket and simple tee-shirt.
There are some gorgeous designs in this month’s issue which you can read more about on the Crochet Now blog. I particularly love the Cabana Cardigan by Tony Lipsey and the Sunrise Beach Picnic Blanket by Zoe Potrac – and who could resist Shaun the Sheep and the Naughty Pigs by Alison Holloway!
To find your nearest stockist, visit www.seymour.co.uk – or you can order online from www.moremags.com/crocheting (US and Australia readers can also order online at MoreMags – copies will be in shops in the US and Australia around 6 weeks after UK release).
If you hook up my Top of the Knots Headband I hope you’ll share your photos with me on social media (facebook, twitter or instagram) or as a project on Ravelry – I love to see what you make!
Until next time folks! Happy hooking, keep calm and crochet on my friends xx
Have you heard about the wonderful international makers project ‘Every Bird sings it’s own Song’? It’s a wonderful crafters connection project to try and create the longest line of hand crafted birds at the Textiel Festival Weerribben (in The Netherlands) in June.
The theme of the festival is Strange Birds, and the idea is to embrace core values of the crafting community of cooperation, diversity and connections.
I was contacted by Esmeralda, a facilitator of the project, to see if I could maybe share the information about the project which I said of course I would; as soon as I heard about this project I knew it was something I wanted to get involved in!
As well as sharing the information about the project here on the blog I decided to also have a go at designing my own little ‘strange bird’ – and the Little Kooky Bird was the result.
I used some Scheepjes Catona from my stash and some scraps of felt to create the little jellybean shaped hanging bird ornament.
Scroll down for the free Little Kooky Bird pattern but before then if you want to join in with the project too, maybe with a Little Kooky Bird you have made yourself, then please send them to: Creazy Ladies: de Hare 10, 8375 GC Oldemarkt, The Netherlands.
Birds don’t have to be crocheted, they can be from various materials: knitting, crocheting, quilting, embroidery, felting, drawn or dyed will all be accepted as long as it is made of textile, wool or yarn. The maximum size of any bird is 25 cm high and 15 cm wide.
The deadline for all birds to be in The Netherlands is 31 May 2019 and you can find out more, or follow the progress of the project of GGDW, on facebook, twitter and instagram with the hashtag of #evc2019
The following pattern is free here on the blog but it’s also available in my Ravelry store where there is a nominal fee for a downloadable 3 page PDF pattern free of advertisements if you’d prefer.
Yarn:4ply / Fingering YarnScheepjes Catona used in photos;
1 x 15g / 37.5m x Shocking Pink (Shade 114)
1 x 10g / 25m x Ultra Violet (Shade 282)
Pattern will work in other hooks and yarns though finished size will be different.
Hook: 2.75mm hook (US size C)
You will also need:
Polyester toy stuffing
2 x 9mm Black Safety Eyes
Small scraps of white and yellow felt
Yellow sewing thread and needle
Small piece of silver thread (optional)
Stitch Markers
Yarn Needle
Gauge: 4dc/sc = 2.5cm (1 inch)
Obtaining the correct gauge is not critical to this project but finished size may differ if your gauge is different to the one specified.
Finished Size: 7.5cm (2.95 inches) high
Abbreviations:
st(s) = stitch(es)
sl st = slip stitch
ch(s) = chain
dc/sc = UK double crochet / US single crochet
dc/sc2tog = UK double crochet 2 together / US double crochet 2 together
htr/hdc = UK half treble / US half double crochet
tr/dc = UK treble / US double crochet
[…] = Repeat the sequence between the square brackets by the number indicated.
(.. sts) = The number in round brackets at the end of the instruction indicates the number of stitches after working the row.
Stitch Guidance:
Slip Stitch (sl st): Insert hook in st indicated, yarn over and draw through all loops.
UK Double Crochet/US Single Crochet (dc/sc): Insert hook in st indicated and draw up a loop (two loops on hook), yarn over, draw through both loops on hook.
UK Double Crochet 2 together / US Single Crochet 2 together (dc/sc2tog): Insert hook in st indicated and pull up a loop (two loops on hook), Insert hook in next st, yarn over, pull through three loops on hook.
UK Half Treble Crochet / US Half Double Crochet (htr/hdc): Insert hook in st indicated and pull up a loop (two loops on hook), Insert hook in next st, yarn over, pull through three loops on hook.
UK Treble / US Double Crochet (tr/dc): Yarn over, insert hook in indicated st and pull up a loop (three loops on hook), yarn over, pull through two loops, yarn over, pull through remaining two loops on hook.
Pattern Notes:
Magic ring: is also known as a Drawstring Ring or Magic Loop and is often used as a start for working amigurumi. If you are not familiar with this technique you could substitute with a ch2 and then work in the second ch from the hook.
Working in the round: Most of the sections of this pattern are worked in the amigurumi style without joining in continuous rounds. Place the stitch marker in the top of the first st to mark the start of each round.
Invisible double crochet decrease: Invisible decreasing is a method of removing stitches to shape your fabric without gaps. Insert hook in the FRONT LOOP ONLY of the first stitch indicated and pull up a loop (two loops on hook), insert hook in the FRONT LOOP ONLY of the next st, yarn over, pull through three loops on hook; decrease made.
Pattern:
Head / Body:
Rnd 1: With Shocking Pink make a magic ring, work 6dc into ring. (6 sts)
Rnd 2: [2dc/sc] to end. (12 sts)
Rnd 3: [1dc/sc, 2dc/sc] to end. (18 sts)
Rnd 4: [1dc/sc in the next two sts, 2dc/sc] to end. (24 sts)
Rnd 5 – 9: 1dc/sc in each st around
Rnd 10: 1dc/sc in 11 sts, 2dc/sc in the next 2sts, 1 dc/sc in 11 sts (26 sts)
Rnd 11: 1dc/sc in 12 sts, 2dc/sc in the next 2sts, 1 dc/sc in 12 sts (28 sts)
Rnd 12: 1dc/sc in 13 sts, 2dc/sc in the next 2sts, 1 dc/sc in 13 sts (30 sts)
Rnd 13: 1dc/sc in 14 sts, 2dc/sc in the next 2sts, 1 dc/sc in 14 sts (32 sts)
Rnd 14: 1dc/sc in each st around
Rnds 15: dc/sc2tog, 1dc/sc in 13 sts, 1dc/sc in the next 2sts, 1 dc/sc in 13 sts, dc/sc2tog (30 sts)
Rnds 16—17: 1dc/sc in each st around
Rnd 18: [1dc/sc in the next three sts, dc/sc2tog] to end. (24 sts)
Rnd 19: 1dc/sc in each st around
Rnd 20: [1dc/sc in the next two sts, dc/sc2tog] to end. (18 sts)
Rnd 21: 1dc/sc in each st around
Cut two small flowers roughly 2.8cm (1.1in) high, cut a small hole in the centre of the flower and thread the safety eye stalk through the hole. Then add the safety eye between rnds 5 – 6 approximately 10 sts apart.
Stuff body.
Rnd 22: [1dc/sc, dc/sc2tog] to end. (12 sts)
Rnd 23: [dc/sc2tog] to end. (6 sts)
Fasten off with a sl st to the next st and using the yarn tail sew up the remaining six sts, weave in ends
Wings:
Make 2. Wings are not stuffed;
Rnd 1: With Ultra Violet 7ch, sl st in second ch from hook, 1dc/sc in the next 2sts, 1htr/hdc in the next 2sts, 8tr/dc in the last st, then working on the other side of your beginning ch; 1htr/hdc in the next 2sts, 1dc/sc in the next 2sts, 1 sl st in the last st.
Fasten off but leave long yarn tail for attaching to body.
Breast:
Make 1.
Rnd 1: With Ultra Violet make a magic ring, work 6dc into ring. (6 sts)
Rnd 2: [2dc/sc] to end. (12 sts)
Rnd 3: [1dc/sc, 2dc/sc] to end. (18 sts)
Rnd 4: [1dc/sc in the next two sts, 2dc/sc] to end. (24 sts)
Fasten off but leave long yarn tail for attaching to body.
Tail Feather:
Make 1.
Rnd 1: With Ultra Violet make a magic ring, work 6dc into ring. (6 sts)
Fasten off but leave long yarn tail for attaching to body.
Making Up:
Cut a small diamond shape out of yellow felt approximately 2cm (0.78in) long.
Attach beak to the front of the head (in-between eyes) on rnd 6 with yellow sewing thread.
Attach the breast onto the front of the body over rnds 13 – 19.
Attach wings over rnds 13-18 on each side of the bird.
Attach the tail feather to the back of the body on rnd 16.
Add your silver thread (or use some Ultra Violet) in a loop to the back of the birds head on rnd 6 so your bird can be hung up.