If you’re looking for a unique baby gift, look no further than my Peekaboo Panel Baby Blanket. This playful design features some perfectly placed offset boxes that offer a fresh, modern twist on a classic filet crochet technique.
Pin for Later:
Here’s a quick rundown of what you’ll need for the Peekaboo Panels Filet Crochet Baby Blanket:
Your choice of yarn (I recommend soft, baby-friendly yarns like DK weight or lighter).
You don’t have to stick to traditional gender colours with this design. I’ve paired a solid main shade with a contrasting border, which can be customised in any colour you like – classic pink or blue, or softer tones like yellow or sage when you’re keeping things neutral.
This is a slightly more adventurous take on a filet crochet blanket. As long as you stay mindful of the pattern, your offset blocks will fall into place beautifully, but I’d definitely recommend checking your work as you go to keep your positive and negative spaces aligned.
I designed this pattern with fellow filet crochet lovers in mind (myself included!), and while it asks for a little extra attention, the result is something truly special that’s well worth the effort. I’ve rated this as an intermediate pattern, but if you are an adventurous beginner that wants to give it a go, or this is the first filet project you are attempting then you might find my blog post ‘Top Tips for Filet Crochet‘ useful.
Although concentration is key if you’re familiar with basic crochet stitches (chains and trebles / US double crochet) you should have no trouble following along to create a blanket you’ll be proud of! In the pattern I’ve included both the written instructions and a helpful chart to guide you through the process.
I’m thrilled to offer this pattern as part of the Baby Shower Blog Hop 2026 hosted by Ambassador Crochet. This limited-time special offer gives you access to the pattern at a special price, so you can get started on your blanket today.
Limited Special Offer
This pattern will be available with a 50% discount for 24hrs (1pm to 1pm GMT / 8am to 8am EST) on Wednesday 22 April 2026 as part of the Baby Shower Blog Hop 2026.
Scroll down the post until you see the download button. The most current featured design will be added to the bottom every morning. This way it stays in chronological order and it’s easy to find the current pattern feature.
Follow the instructions to get today’s blog post link and / or coupon code to use on Ravelry or Etsy.
Download the pattern to your device or library!
If you are reading this after the promotion has passed you can purchase the blanket from any of the links to my patterns stores (links above)
I can’t wait to see your versions of the Peekaboo Panel Baby Blanket! Be sure to tag me on social media (facebook, twitter or instagram) or as a project on Ravelry) with your WIPs or finished projects—I love seeing what you all come up with. And if you have any questions, feel free to drop them in the comments below.
Make sure you’re subscribed to the blog (below) and/or joined my mailing list so you don’t miss any updates – including new blog posts, exclusive discounts, and pattern releases!
Until next time folks! Happy hooking, keep calm and crochet on my friends xx
Subscribe to the blog:
Please note that some of the links in my blog are affiliate links. I may earn a small commission if you purchase via these links, but the price you pay is not affected. You can read more about my affiliate links here.
If you’re looking for a unique baby shower gift, look no further than my Diamond Daydream Baby Blanket. This delightful design showcases an elegant blocky stripe pattern that offers a fresh, modern twist on a classic filet crochet technique
Pin for Later:
Here’s a quick rundown of what you’ll need for the Diamond Daydream Filet Crochet Baby Blanket:
Your choice of yarn (I recommend soft, baby-friendly yarns like DK weight or lighter). I used Paintbox Special DK (Light Worsted), a wonderfully soft and, most importantly, machine-washable 100% acrylic yarn—ideal for baby blankets. Each 100g ball contains 276m (302yds) of yarn, giving you plenty to work with, making it a perfect choice for creating cosy blankets.
Some stitch markers to help track your filet crochet as you work (optional but useful!)
A comfortable space to enjoy the crochet process, and some time to dream of the lovely bundle of joy who will receive this masterpiece!
I’ve created my blanket using two soft, complementary colours (Paper White 100 and Stormy Grey 104) to make the most of the blocky striped effect, but the possibilities are endless! Imagine how a pastel rainbow of five gentle shades would look—so dreamy, right? Whether you go for one colour or multiple, this blanket will make a statement, no matter the hue.
I created this pattern with fellow filet crochet lovers in mind (myself included!), featuring an easy-to-follow design that’s both enjoyable and relaxing to work on. It’s the perfect project to keep your hands busy while crafting something truly special. However if this is the first filet project you are attempting, or you’d like a refresher, then you might find my blog post ‘Top Tips for Filet Crochet‘ useful.
The pattern is very beginner-friendly—if you’re familiar with basic crochet stitches (chains and trebles / US double crochet), you should have no trouble following along and creating a blanket you’ll be proud of! In the pattern I’ve included both the written instructions and a helpful chart to guide you through the process.
I’m thrilled to offer this pattern as part of the Baby Shower Blog Hop! This limited-time special offer gives you access to the pattern at a special price, so you can get started on your blanket today. It’s the perfect project for welcoming a little one into the world.
Limited Special Offer
This pattern will be available with a 50% discount for 24hrs (1pm to 1pm GMT / 8am to 8am EST) on Wednesday 14 May 2025 as part of the Baby Shower Blog Hop.
Scroll down the designer’s post until you see the download button. The most current featured design will be added to the bottom every morning. This way it stays in chronological order and it’s easy to find the current pattern feature.
Follow the instructions to get today’s blog post link and / or coupon code to use on Ravelry or Etsy.
Download the pattern to your device or library!
If you are reading this after the promotion has passed you can purchase the blanket from any of the links to my patterns stores (links above)
Limited Edition Bundle:
All the patterns from Baby Shower Blog Hop are available in a limited edition bundle. Get all 28 patterns for only £9.02 / $12. That’s less than 32p / .50 cents per pattern! The collection is only available until 15 May 2025, Go straight to the bundle via the link below:
I can’t wait to see your versions of the Diamond Daydreams Blanket! Be sure to tag me on social media (facebook, twitter or instagram) or as a project on Ravelry) with your WIPs or finished projects—I love seeing what you all come up with. And if you have any questions, feel free to drop them in the comments below.
Make sure you’re subscribed to the blog (below) and/or joined my mailing list so you don’t miss any updates — including new blog posts, exclusive discounts, and pattern releases!
Until next time folks! Happy hooking, keep calm and crochet on my friends xx
Subscribe to the blog:
Please note that some of the links in my blog are affiliate links. I may earn a small commission if you purchase via these links, but the price you pay is not affected. You can read more about my affiliate links here.
What’s October without a mass influx of pumpkins!! And today I’m going to share another one with you with my Pumpkin Pal Bib. A quick and easy pattern to whip up for any little pumpkin babes!
Something I’ve not been the greatest at doing is keeping up with re-releasing designs where the pattern rights have come back to me. I think today’s pattern is possibly one of the oldest I’d not previously re-formated! Originally featured in the 2017 October edition of I Like Crochet magazine it’s only taken me XX amount of years to finally sort it out – opps!
It’s now been updated for 2023 with availability in both UK and US crochet terminology.
But let me tell you about the pattern; designed for easy make-ability this jack-o’-lantern style baby bib is just perfect for Halloween. It doesn’t take long to make and you could easily hook one or two up in time for 31 October.
For this bib I original used Garnstudio Drops Cotton Paris (100% Cotton; 82 yards, [75 meters 110 meters]/50 grams) with a 3.75mm (US size F/5) hook but any Aran / Worsted weight cotton would work.
For your bib you need at least four colours I used; colour number 13 Orange (A), 2 balls; colour number 43: Green (B), 1 ball; colour number 16: White (C), 1 ball; colour number 15: Black (D), 1 ball. Other than that you would need some stitch markers and a yarn needle to sew all the pieces together.
The pattern is now available from my usual pattern stores for you to make your own version at the links below:
Until next time folks! Happy hooking and keep calm and crochet on my friends xx
Please note that some of the links in my blog are affiliate links. I may earn a small commission if you purchase via these links, but the price you pay is not affected.
As Coronavirus sweeps across the UK, many people have responded by putting rainbow pictures in their windows. The rainbows have come to represent “positivity, hope and togetherness” during the pandemic. Today’s free blanket pattern not only take inspiration from that but also in the simple joys that a rainbow brings any time you see one.
It’s been a while since I shared a free pattern for you here on the blog, and I wanted todays blanket to be something positive that came from the lockdown, something that you could enjoy making, and maybe look forward to gifting to others after lockdown is over.
During the pandemic I found myself looking for nice mindful patterns, where I could keep my hands busy and just lose myself in the stitches. Sometimes you just find a stitch pattern that you just enjoy making and for me that’s definitely the box stitch.
I think it might be known as other names, but to me it looks like rows of little boxes when put together.
Worked in double knit this lightweight blanket is easy to memorise making it a perfect pattern for relaxing hooky time! I made my blanket from some Scheepjes Colour Crafter that I’d got in my stash.
The following pattern is free here on the blog but it’s also available in my Ravelry, Etsy or LoveCrafts stores where there is a nominal fee for a downloadable 3 page PDF pattern free of advertisements if you’d prefer. The PDF download is available in UK or US crochet terminology.
Oh and if you enjoy making this box stitch blanket then you may also enjoy the ‘Don’t Box Me In’ blanket I designed for Dear Ewe which features the same stitch. You can pick up that free pattern over on the Dear Ewe blog.
Boxing Rainbows Blanket
MATERIALS Yarn: 8ply / yarn weight #3 100g / 300m White 25g / 75m Red 25g / 75m Orange 25g / 75m Yellow 25g / 75m Green 25g / 75m Blue 25g / 75m Indigo 25g / 75m Violet 25g / 75m Pink Scheepjes Colour Crafter in Weert (1001), Amsterdam (1010), Gent (2002), Leuven (2008), Terneuzen (1821), Knokke (2012), Brugge (2003), Drachten (1827), Luik (2006) used in photos. You will also need: Scissors A yarn needle
Hook: 4mm (US Size G/6) Gauge: 2 clusters= 3.5cm / 1.37” Obtaining the correct gauge is not critical to this project but if your gauge does not match then your finished item will be a different size. Pattern will work in other hooks and yarns though finished size will be different. Finished Size: 86cm (33.8”) long x 68cm (26.7”)
ABBREVIATIONS: UK TERMS st(s) stitch(es) sl st slip stitch ch(s) chain dc double crochet tr treble crochet RS right side
STITCH GUIDANCE Slip Stitch (sl st): Insert hook in st indicated, yarn over and draw through all loops. Double Crochet (dc): Insert hook in st indi-cated and pull up a loop (two loops on hook), yarn over, pull through both loops on hook. Treble Crochet (tr): Yarn over, insert hook in indicated st and pull up a loop (three loops on hook), yarn over, pull through two loops, yarn over, pull through remaining two loops on hook. Cluster (Cl): Three treble crochets worked in a ch3-sp
PATTERN NOTES Make the blanket bigger or smaller by making the beginning chain in a multiple of 3+5 (stitch counts in the pattern are for the blanket size specified on page 1) A ch3 at the start of a row counts as a st
PATTERN Row 1: (RS) With Pink; ch43, 1tr in the 4th ch from hook, 1tr in each st along until end, turn. 41sts Row 2: Ch1, (1dc in-between the first 2trs of previous row, ch3, miss 3sts, 1dc in-between the next 2trs of row 1) repeat across until end, turn. 14dc + 13 x ch3-sps Row 3: Ch3, (miss the next dc, 1Cl in the next ch3-sp) repeat across until the last st, 1tr in the last st, turn. 41sts / 13 clusters + 1tr at either end of row. Rows 4 – 5: Repeat rows 2 and 3. Fasten off Pink and weave in ends. Row 6: Attach White, in-between the first 2trs of previous row with a sl st. Ch1, (1dc in-between the first 2trs of row 1, ch3, miss 3sts, 1dc in-between the next 2trs of row 1) repeat across until end, turn. Rows 7 – 9: Repeat alternate rows of 3 and 2 for the pattern. Fasten off White and weave in ends. Row 10: Attach Violet, in-between the first 2trs of previous row with a sl st. Ch1, (1dc in-between the first 2trs of row 1, ch3, miss 3sts, 1dc in-between the next 2trs of row 1) repeat across until end, turn. Rows 11 – 15: Repeat alternate rows of 3 and 2 for the pattern. Fasten off Indigo and weave in ends. Row 16: Attach White, in-between the first 2trs of previous row with a sl st. Ch1, (1dc in-between the first 2trs of row 1, ch3, miss 3sts, 1dc in-between the next 2trs of row 1) repeat across until end, turn. Rows 17 – 19: Repeat alternate rows of 3 and 2 for the pattern. Fasten off White and weave in ends. Row 20: Attach Indigo, in-between the first 2trs of previous row with a sl st. Ch1, (1dc in-between the first 2trs of row 1, ch3, miss 3sts, 1dc in-between the next 2trs of row 1) repeat across until end, turn. Rows 21 – 25: Repeat alternate rows of 3 and 2 for the pattern. Fasten off Indigo and weave in ends. Row 26: Attach White, in-between the first 2trs of previous row with a sl st. Ch1, (1dc in-between the first 2trs of row 1, ch3, miss 3sts, 1dc in-between the next 2trs of row 1) repeat across until end, turn. Rows 27 – 29: Repeat alternate rows of 3 and 2 for the pattern. Fasten off White and weave in ends. Row 30: Attach Blue, in-between the first 2trs of previous row with a sl st. Ch1, (1dc in-between the first 2trs of row 1, ch3, miss 3sts, 1dc in-between the next 2trs of row 1) repeat across until end, turn. Rows 31 – 35: Repeat alternate rows of 3 and 2 for the pattern. Fasten off Blue and weave in ends. Row 36: Attach White, in-between the first 2trs of previous row with a sl st. Ch1, (1dc in-between the first 2trs of row 1, ch3, miss 3sts, 1dc in-between the next 2trs of row 1) repeat across until end, turn. Rows 37 – 39: Repeat alternate rows of 3 and 2 for the pattern. Fasten off White and weave in ends. Row 40: Attach Green, in-between the first 2trs of previous row with a sl st. Ch1, (1dc in-between the first 2trs of row 1, ch3, miss 3sts, 1dc in-between the next 2trs of row 1) repeat across until end, turn. Rows 41 – 45: Repeat alternate rows of 3 and 2 for the pattern. Fasten off Green and weave in ends. Row 46: Attach White, in-between the first 2trs of previous row with a sl st. Ch1, (1dc in-between the first 2trs of row 1, ch3, miss 3sts, 1dc in-between the next 2trs of row 1) repeat across until end, turn. Rows 47 – 49: Repeat alternate rows of 3 and 2 for the pattern. Fasten off White and weave in ends. Row 50: Attach Yellow, in-between the first 2trs of previous row with a sl st. Ch1, (1dc in-between the first 2trs of row 1, ch3, miss 3sts, 1dc in-between the next 2trs of row 1) repeat across until end, turn. Rows 51 – 55: Repeat alternate rows of 3 and 2 for the pattern. Fasten off Yellow and weave in ends. Row 56: Attach White, in-between the first 2trs of previous row with a sl st. Ch1, (1dc in-between the first 2trs of row 1, ch3, miss 3sts, 1dc in-between the next 2trs of row 1) repeat across until end, turn. Rows 57 – 59: Repeat alternate rows of 3 and 2 for the pattern. Fasten off White and weave in ends. Row 60: Attach Orange, in-between the first 2trs of previous row with a sl st. Ch1, (1dc in-between the first 2trs of row 1, ch3, miss 3sts, 1dc in-between the next 2trs of row 1) repeat across until end, turn. Rows 61 – 65: Repeat alternate rows of 3 and 2 for the pattern. Fasten off Orange and weave in ends. Row 66: Attach White, in-between the first 2trs of previous row with a sl st. Ch1, (1dc in-between the first 2trs of row 1, ch3, miss 3sts, 1dc in-between the next 2trs of row 1) repeat across until end, turn. Rows 67 – 69: Repeat alternate rows of 3 and 2 for the pattern. Fasten off White and weave in ends. Row 70: Attach Red, in-between the first 2trs of previous row with a sl st. Ch1, (1dc in-between the first 2trs of row 1, ch3, miss 3sts, 1dc in-between the next 2trs of row 1) repeat across until end, turn. Rows 71 – 75: Repeat alternate rows of 3 and 2 for the pattern. Fasten off Red and weave in ends. You will now need to rotate your work to the right so you can continue working on the long edge of the RS of your work. Row 76: Attach White to the post of the 1tr of row 75, Ch3, 3tr in the first sp, then work a Cl in the tr post sp of each row along until the last tr last dc (of row 1), then work 4tr in the last sp, turn. 38 clusters + 2 x 1trs at the end of each row / 116sts Rows 77 – 78: Repeat alternate rows of 2 and 3 for the pattern. Fasten off White and weave in ends. Row 79: Attach Blue, in-between the first 2trs of previous row with a sl st. Ch1, (1dc in-between the first 2trs of row 1, ch3, miss 3sts, 1dc in-between the next 2trs of row 1) repeat across until end, turn. Rows 80 – 84: Repeat alternate rows of 3 and 2 for the pattern. Fasten off Blue and weave in ends. Row 85: Attach White, in-between the first 2trs of previous row with a sl st. Ch1, (1dc in-between the first 2trs of row 1, ch3, miss 3sts, 1dc in-between the next 2trs of row 1) repeat across until end, turn. Rows 86 – 88: Repeat alternate rows of 3 and 2 for the pattern. Fasten off White and weave in ends. Row 89: Attach Indigo, in-between the first 2trs of previous row with a sl st. Ch1, (1dc in-between the first 2trs of row 1, ch3, miss 3sts, 1dc in-between the next 2trs of row 1) repeat across until end, turn. Rows 90 – 94: Repeat alternate rows of 3 and 2 for the pattern. Fasten off Indigo and weave in ends. Row 95: Attach White, in-between the first 2trs of previous row with a sl st. Ch1, (1dc in-between the first 2trs of row 1, ch3, miss 3sts, 1dc in-between the next 2trs of row 1) repeat across until end, turn. Rows 96 – 98: Repeat alternate rows of 3 and 2 for the pattern. Fasten off White and weave in ends. Row 99: Attach Violet, in-between the first 2trs of previous row with a sl st. Ch1, (1dc in-between the first 2trs of row 1, ch3, miss 3sts, 1dc in-between the next 2trs of row 1) repeat across until end, turn. Rows 100 – 104: Repeat alternate rows of 3 and 2 for the pattern. Fasten off Violet and weave in ends. Row 105: Attach White, in-between the first 2trs of previous row with a sl st. Ch1, (1dc in-between the first 2trs of row 1, ch3, miss 3sts, 1dc in-between the next 2trs of row 1) repeat across until end, turn. Rows 106 – 108: Repeat alternate rows of 3 and 2 for the pattern. Fasten off White and weave in ends. Row 109: Attach Pink, in-between the first 2trs of previous row with a sl st. Ch1, (1dc in-between the first 2trs of row 1, ch3, miss 3sts, 1dc in-between the next 2trs of row 1) repeat across until end, turn. Rows 110 – 114: Repeat alternate rows of 3 and 2 for the pattern. Fasten off Pink and weave in ends. You will now need to rotate your work to the right again so you can continue working on the other long edge of the RS of your work. Row 115: Attach White to the post of the 1tr of row 75, Ch3, 3tr in the first sp, then work a Cl in the tr post sp of each row along until the last tr last dc (of row 1), then work 4tr in the last sp, turn. 38 clusters + 2 x 1trs at the end of each row / 116sts Rows 116 – 117: Repeat alternate rows of 2 and 3 for the pattern. Fasten off White and weave in ends. Row 118: Attach Green, in-between the first 2trs of previous row with a sl st. Ch1, (1dc in-between the first 2trs of row 1, ch3, miss 3sts, 1dc in-between the next 2trs of row 1) repeat across until end, turn. Rows 119 – 123: Repeat alternate rows of 3 and 2 for the pattern. Fasten off Green and weave in ends. Row 124: Attach White, in-between the first 2trs of previous row with a sl st. Ch1, (1dc in-between the first 2trs of row 1, ch3, miss 3sts, 1dc in-between the next 2trs of row 1) repeat across until end, turn. Rows 125 – 127: Repeat alternate rows of 3 and 2 for the pattern. Fasten off White and weave in ends. Row 128: Attach Yellow, in-between the first 2trs of previous row with a sl st. Ch1, (1dc in-between the first 2trs of row 1, ch3, miss 3sts, 1dc in-between the next 2trs of row 1) repeat across until end, turn. Rows 129 – 133: Repeat alternate rows of 3 and 2 for the pattern. Fasten off Yellow and weave in ends. Row 134: Attach White, in-between the first 2trs of previous row with a sl st. Ch1, (1dc in-between the first 2trs of row 1, ch3, miss 3sts, 1dc in-between the next 2trs of row 1) repeat across until end, turn. Rows 135 – 137: Repeat alternate rows of 3 and 2 for the pattern. Fasten off White and weave in ends. Row 138: Attach Orange, in-between the first 2trs of previous row with a sl st. Ch1, (1dc in-between the first 2trs of row 1, ch3, miss 3sts, 1dc in-between the next 2trs of row 1) repeat across until end, turn. Rows 139 – 143: Repeat alternate rows of 3 and 2 for the pattern. Fasten off Orange and weave in ends. Row 144: Attach White, in-between the first 2trs of previous row with a sl st. Ch1, (1dc in-between the first 2trs of row 1, ch3, miss 3sts, 1dc in-between the next 2trs of row 1) repeat across until end, turn. Rows 145 – 147: Repeat alternate rows of 3 and 2 for the pattern. Fasten off White and weave in ends. Row 148: Attach Red, in-between the first 2trs of previous row with a sl st. Ch1, (1dc in-between the first 2trs of row 1, ch3, miss 3sts, 1dc in-between the next 2trs of row 1) repeat across until end, turn. Rows 149 – 153: Repeat alternate rows of 3 and 2 for the pattern. Fasten off Red and weave in ends.
Looking for some projects that are fast and rewarding? I’ve got a series of new one-ball crochet patterns out now in the I Like Crochet Collections. Including a cowl, a Tunisian crochet glasses case and some cute baby booties!
If you’ve not heard of I Like Crochet Collections before it’s part of the I Like Crochet Network for crochet enthusiasts, and the same people that publish the popular I Like Crochet e-magazine. Based in the US the patterns on the site are written in US terminology, but if you are happy to convert patterns then there’s a wealth of designs (and great designers).
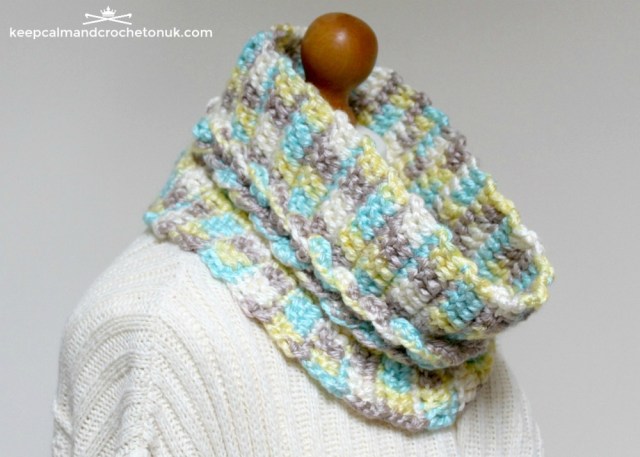
Now do you have a ball of chunky weight yarn sadly languishing in your stash and you don’t know what to make with it? Then how about the Colbie Cowl…
This simple cowl takes advantage of a fun stitch and lets the yarn do the rest of the talking! It’s great for variegated yarn for a subtle finish or you could go bold with a block colour to create a real statement piece.
You can find this cowl under collections in the One Skein Collection, it’s a great project for beginners and a fast make for more experienced crocheters!
I loved the challenge of coming up with some patterns that use one ball of yarn or less! I also created the Siesta Sunglasses Case available in The Beach Collection. This fun little case is worked in Tunisian crochet which makes it the perfect sunglasses protector at the beach.
The tight stitches paired with its drawstring closure ensure your sunnies stay safe and sand free! I always forget how I enjoy working on a Tunisian Crochet project until I do it! Do you like Tunisian crochet? I feel like I’ve got lots more to discover there…
And finally, my favourite of the collections, are the Sleepy Unicorn Booties which are part of the The Best Baby Crochet Patterns Collection. My brother had not long had a new baby girl and she was definitely the inspiration behind these.
I wanted to create something cute and girly – and with the sleepy little eyes, golden horns and pastel manes, these booties are irresistible to make and so much fun to give!
The collections are currently exclusive to the I Like Crochet Network, there are various sign up options (and they often have special subscriptions offers) that you can learn more here.
Until next time folks! Happy hooking, keep calm and crochet on my friends xx
I was so busy telling you about Spot the Dog the other day that I didn’t tell you about the other pattern I’ve got in the latest issue of Crochet Now magazine. Now you can help little one’s master shapes and colours with my new fun crochet Play and Learn Set.
The play and learn set was designed to teach little ones about colours and shapes in a fun soft play set complete with a drawstring storage bag. Not only does it give them the chance to identify and compare colours and shapes, it’s something that they can touch and feel too – which I think is all part of the creative learning process isn’t it.
I was thinking about the Spot the Dog books, which are very much about things like determining shapes and colours, when I was designing this set and also about my two year old. ‘What’s this shape’ and ‘what’s this colour’ are totally the things that we are talking about at the moment and so this was very much inspired by her.
In the set are a squishy square, circle, oval, rectangle, triangle and star all in bold and bright primary colours. And there is a photo tutorial included to explain how to do surface crochet (which is how I did the word ‘Shapes’ on the front of the bag) if you’ve not tried that before.
I used Rico Design Ricorumi which is 100% DK cotton for both the shapes and the bag as I wanted something that was going to be durable and that could stand up to lots of touching from little hands!
Little Miss loved the shapes and particularly enjoyed getting each shape out and then putting them away again…and then getting them out…and then putting them away again…
This is just a fab little diy busy bag that will keep them engaged and that you can play along with too. I also think this could be a fun set for a nursery or playgroup too as well as for any little ones you know.
As I said at the start, this Play and Learn set pattern is available now in Issue 41 of Crochet Now magazine which is available in all major supermarkets and newsagents across the UK.
Until next time folks! Happy hooking, keep calm and crochet on my friends xx
My heart is brimming over at the moment with childhood nostalgia! Look it’s crocheted Spot the Dog!! I’ve been so excited about this design and I’m so happy to finally share it with you!
I cannot image my childhood without the classic Spot the Dogbooks, I remember flipping the flaps of Where’s Spot? when I was young, then I reread the various board books to my eldest when she was small, and more recently I’m enjoying rediscovering them with my two year old.
I was therefore absolutely delighted when Crochet Now magazine asked me if I’d like to have a go at designing the crochet version of Spot.
If you aren’t familiar with Spot, he is a lovable yellow puppy character created by Eric Hill who is a firm favourite with toddlers and pre-schoolers. The children’s books have sold more than 60 million copies and 2020 will be celebration year for Spot’s 40th birthday.
Of course I said YES and got to planning. It wasn’t until after I’d said yes that I kind of realised what a task I’d taken on! Spot is such a well loved character that I really had to get him just right! It was very important therefore that what ever I did was a faithful representation of Spot the dog and was in keeping with his lovable playfulness.
This was also a very different experience for me as it wasn’t going to be my design per-say as it’s a character that already exists and I was very grateful for the supportive guidance from Crochet Now magazine and Penguin books who publish the Spot the Dog books
My Spot went through lots of different phases of sketches before I got my crochet hooks out and then I tried out different shaping techniques to get the look of the 2-D character into a 3-D form. Picking the perfect ‘Spot’ yellow and brown was also very crucial to the process!
The finished Spot is about 15.5cm tall and I designed him with embroidered features which makes him perfect for little ones under 36 months – for older children or adults you could use safety eyes instead.
I love how he turned out in the end, and I love how the magazine have styled him so he looks JUST like he’s stepped out of one of his own books!
Do you love Spot? You can get the exclusive pattern and kit to make him now in Crochet Now magazine Issue 41! Just so you know, due to the branding guidelines, this pattern will never be released by me independently, you will only be able to get him through the magazine – so if you want him you need to go get him quick!
Crochet Now is available in all major supermarkets and newsagents across the UK and there is a subscription available to overseas customers which you can find out more about on their website.
I’ve also got another design out in this months issue that’s kind of related to Spot but I’ll talk about that a bit more soon!
Until next time folks! Happy hooking, keep calm and crochet on my friends xx
Have you heard about the wonderful international makers project ‘Every Bird sings it’s own Song’? It’s a wonderful crafters connection project to try and create the longest line of hand crafted birds at the Textiel Festival Weerribben (in The Netherlands) in June.
The theme of the festival is Strange Birds, and the idea is to embrace core values of the crafting community of cooperation, diversity and connections.
I was contacted by Esmeralda, a facilitator of the project, to see if I could maybe share the information about the project which I said of course I would; as soon as I heard about this project I knew it was something I wanted to get involved in!
As well as sharing the information about the project here on the blog I decided to also have a go at designing my own little ‘strange bird’ – and the Little Kooky Bird was the result.
I used some Scheepjes Catona from my stash and some scraps of felt to create the little jellybean shaped hanging bird ornament.
Scroll down for the free Little Kooky Bird pattern but before then if you want to join in with the project too, maybe with a Little Kooky Bird you have made yourself, then please send them to: Creazy Ladies: de Hare 10, 8375 GC Oldemarkt, The Netherlands.
Birds don’t have to be crocheted, they can be from various materials: knitting, crocheting, quilting, embroidery, felting, drawn or dyed will all be accepted as long as it is made of textile, wool or yarn. The maximum size of any bird is 25 cm high and 15 cm wide.
The deadline for all birds to be in The Netherlands is 31 May 2019 and you can find out more, or follow the progress of the project of GGDW, on facebook, twitter and instagram with the hashtag of #evc2019
The following pattern is free here on the blog but it’s also available in my Ravelry store where there is a nominal fee for a downloadable 3 page PDF pattern free of advertisements if you’d prefer.
Yarn:4ply / Fingering YarnScheepjes Catona used in photos;
1 x 15g / 37.5m x Shocking Pink (Shade 114)
1 x 10g / 25m x Ultra Violet (Shade 282)
Pattern will work in other hooks and yarns though finished size will be different.
Hook: 2.75mm hook (US size C)
You will also need:
Polyester toy stuffing
2 x 9mm Black Safety Eyes
Small scraps of white and yellow felt
Yellow sewing thread and needle
Small piece of silver thread (optional)
Stitch Markers
Yarn Needle
Gauge: 4dc/sc = 2.5cm (1 inch)
Obtaining the correct gauge is not critical to this project but finished size may differ if your gauge is different to the one specified.
Finished Size: 7.5cm (2.95 inches) high
Abbreviations:
st(s) = stitch(es)
sl st = slip stitch
ch(s) = chain
dc/sc = UK double crochet / US single crochet
dc/sc2tog = UK double crochet 2 together / US double crochet 2 together
htr/hdc = UK half treble / US half double crochet
tr/dc = UK treble / US double crochet
[…] = Repeat the sequence between the square brackets by the number indicated.
(.. sts) = The number in round brackets at the end of the instruction indicates the number of stitches after working the row.
Stitch Guidance:
Slip Stitch (sl st): Insert hook in st indicated, yarn over and draw through all loops.
UK Double Crochet/US Single Crochet (dc/sc): Insert hook in st indicated and draw up a loop (two loops on hook), yarn over, draw through both loops on hook.
UK Double Crochet 2 together / US Single Crochet 2 together (dc/sc2tog): Insert hook in st indicated and pull up a loop (two loops on hook), Insert hook in next st, yarn over, pull through three loops on hook.
UK Half Treble Crochet / US Half Double Crochet (htr/hdc): Insert hook in st indicated and pull up a loop (two loops on hook), Insert hook in next st, yarn over, pull through three loops on hook.
UK Treble / US Double Crochet (tr/dc): Yarn over, insert hook in indicated st and pull up a loop (three loops on hook), yarn over, pull through two loops, yarn over, pull through remaining two loops on hook.
Pattern Notes:
Magic ring: is also known as a Drawstring Ring or Magic Loop and is often used as a start for working amigurumi. If you are not familiar with this technique you could substitute with a ch2 and then work in the second ch from the hook.
Working in the round: Most of the sections of this pattern are worked in the amigurumi style without joining in continuous rounds. Place the stitch marker in the top of the first st to mark the start of each round.
Invisible double crochet decrease: Invisible decreasing is a method of removing stitches to shape your fabric without gaps. Insert hook in the FRONT LOOP ONLY of the first stitch indicated and pull up a loop (two loops on hook), insert hook in the FRONT LOOP ONLY of the next st, yarn over, pull through three loops on hook; decrease made.
Pattern:
Head / Body:
Rnd 1: With Shocking Pink make a magic ring, work 6dc into ring. (6 sts)
Rnd 2: [2dc/sc] to end. (12 sts)
Rnd 3: [1dc/sc, 2dc/sc] to end. (18 sts)
Rnd 4: [1dc/sc in the next two sts, 2dc/sc] to end. (24 sts)
Rnd 5 – 9: 1dc/sc in each st around
Rnd 10: 1dc/sc in 11 sts, 2dc/sc in the next 2sts, 1 dc/sc in 11 sts (26 sts)
Rnd 11: 1dc/sc in 12 sts, 2dc/sc in the next 2sts, 1 dc/sc in 12 sts (28 sts)
Rnd 12: 1dc/sc in 13 sts, 2dc/sc in the next 2sts, 1 dc/sc in 13 sts (30 sts)
Rnd 13: 1dc/sc in 14 sts, 2dc/sc in the next 2sts, 1 dc/sc in 14 sts (32 sts)
Rnd 14: 1dc/sc in each st around
Rnds 15: dc/sc2tog, 1dc/sc in 13 sts, 1dc/sc in the next 2sts, 1 dc/sc in 13 sts, dc/sc2tog (30 sts)
Rnds 16—17: 1dc/sc in each st around
Rnd 18: [1dc/sc in the next three sts, dc/sc2tog] to end. (24 sts)
Rnd 19: 1dc/sc in each st around
Rnd 20: [1dc/sc in the next two sts, dc/sc2tog] to end. (18 sts)
Rnd 21: 1dc/sc in each st around
Cut two small flowers roughly 2.8cm (1.1in) high, cut a small hole in the centre of the flower and thread the safety eye stalk through the hole. Then add the safety eye between rnds 5 – 6 approximately 10 sts apart.
Stuff body.
Rnd 22: [1dc/sc, dc/sc2tog] to end. (12 sts)
Rnd 23: [dc/sc2tog] to end. (6 sts)
Fasten off with a sl st to the next st and using the yarn tail sew up the remaining six sts, weave in ends
Wings:
Make 2. Wings are not stuffed;
Rnd 1: With Ultra Violet 7ch, sl st in second ch from hook, 1dc/sc in the next 2sts, 1htr/hdc in the next 2sts, 8tr/dc in the last st, then working on the other side of your beginning ch; 1htr/hdc in the next 2sts, 1dc/sc in the next 2sts, 1 sl st in the last st.
Fasten off but leave long yarn tail for attaching to body.
Breast:
Make 1.
Rnd 1: With Ultra Violet make a magic ring, work 6dc into ring. (6 sts)
Rnd 2: [2dc/sc] to end. (12 sts)
Rnd 3: [1dc/sc, 2dc/sc] to end. (18 sts)
Rnd 4: [1dc/sc in the next two sts, 2dc/sc] to end. (24 sts)
Fasten off but leave long yarn tail for attaching to body.
Tail Feather:
Make 1.
Rnd 1: With Ultra Violet make a magic ring, work 6dc into ring. (6 sts)
Fasten off but leave long yarn tail for attaching to body.
Making Up:
Cut a small diamond shape out of yellow felt approximately 2cm (0.78in) long.
Attach beak to the front of the head (in-between eyes) on rnd 6 with yellow sewing thread.
Attach the breast onto the front of the body over rnds 13 – 19.
Attach wings over rnds 13-18 on each side of the bird.
Attach the tail feather to the back of the body on rnd 16.
Add your silver thread (or use some Ultra Violet) in a loop to the back of the birds head on rnd 6 so your bird can be hung up.
So a while back an idea popped into my brain to make a little bluebird amigurumi. I think I’d read somewhere that they had something to do with being happy, so I did a little Google research and discovered that yes, bluebirds are seen as a symbol of happiness in many cultures which dates back thousands of years. How cool is that!
I don’t think you can ever have TOO much felicity in your life and I liked the idea of making a wee bit for myself and of course sharing some joyousness with you!
Oh I apologise in advance for all the synonyms for happiness I use in this post – the thesaurus was my friend ladies and gentlemen!
Hopefully this free pattern will bring YOU a bit of good cheer and maybe you can pass on a bit of jocularity and glee if you make a little bluebird for someone else (or just make two and double the happy!)
My eldest daughter has said that the bluebirds name is ‘Blue’ which isn’t incredibly original, bless her, but it certainly is very fitting! I made him in Scheepjes Catona Cyan Blue (Shade 397) which was exactly the colour I’d envisioned him to be.
And here is Blue enjoying some lovely Spring sunshine – as was I when I was taking these photos. I so do love Spring with it’s promise of warmer days, lighter evenings and blossoming flowers don’t you? We are waiting in anticipation here for the annual cherry tree blossom flowering of the trees that line our street – it’s always a joy to see.
Worked in the round in amigurumi style this little bluebird is a quick project to make up and you can easily whip a couple up in an evening.
The fiddly (or fun bit depending on how you look at it) is making some wire feet, the wire I used was floral wire doubled together which I just twisted with my hands until they looked right. Alternatively one of my testers created a bird without legs so it looked like it was sitting (would look perfect with a little nest of yarn) and another tester used pipe cleaners for the feet, which I thought was a really good idea, and which might be easier to manipulate.
The following pattern is free here on the blog but it’s also available in my Ravelry store where there is a nominal fee for a downloadable 3 page PDF pattern free of advertisements if you’d prefer.
Yarn:4ply / Fingering YarnScheepjes Catona used in photos;
1 x 25g / 62m x Cyan Blue (Shade 397)
1 x 10g / 25m x Lemon (Shade 280)
Pattern will work in other hooks and yarns though finished size will be different.
Hook: 2.5mm hook (US size C/2)
You will also need:
Polyester toy stuffing
Florist or jewellery wire for feet
Black embroidery thread
Stitch Markers
Yarn Needle
PVC glue (optional)
Gauge: 5dc/sc = 2.5cm (1 inch)
Obtaining the correct gauge is not critical to this project but yarn amounts and finished size of projecy may differ if your gauge is different from mine.
Finished Size: 25cm (9.8 inches) from nose to tail
Abbreviations:
st(s) = stitch(es)
sl st = slip stitch
ch(s) = chain
dc/sc = UK double crochet / US single crochet
dc/sc2tog = UK double crochet 2 together / US double crochet 2 together
[…] = Repeat the sequence between the square brackets by the number indicated.
(.. sts) = The number in round brackets at the end of the instruction indicates the number of stitches after working the row.
Stitch Guidance:
Slip Stitch (sl st): Insert hook in st indicated, yarn over and draw through all loops.
UK Double Crochet/US Single Crochet (dc/sc): Insert hook in st indicated and draw up a loop (two loops on hook), yarn over, draw through both loops on hook.
UK Double Crochet 2 together / US Single Crochet 2 together (dc/sc2tog):
Insert hook in st indicated and pull up a loop (two loops on hook), Insert hook in next st, yarn over, pull through three loops on hook.
Pattern Notes:
Magic ring: is also known as a Drawstring Ring or Magic Loop and is often used as a start for working amigurumi. If you are not familiar with this technique you could substitute with a ch2 and then work in the second ch from the hook.
Working in the round: Most of the sections of this pattern are worked in the amigurumi style without joining in continuous rounds. Place the stitch marker in the top of the first st to mark the start of each round.
Invisible double crochet decrease: Invisible decreasing is a method of removing stitches to shape your fabric without gaps. Insert hook in the FRONT LOOP ONLY of the first stitch indicated and pull up a loop (two loops on hook), insert hook in the FRONT LOOP ONLY of the next st, yarn over, pull through three loops on hook; decrease made.
Pattern:
Head:
Rnd 1: With Cyan Blue make a magic ring, work 6dc into ring. (6 sts)
Rnd 2: [2dc] to end. (12 sts)
Rnd 3: [1dc, 2dc] to end. (18 sts)
Rnd 4: [1dc in the next two sts, 2dc] to end. (24 sts)
Rnd 5: [1dc in the next three sts, 2dc] to end. (30 sts)
Rnds 6 – 10: 1dc in each st around
Rnd 11: [1dc in the next three sts, dc2tog] to end. (24 sts)
Rnd 12: [1dc in the next two sts, dc2tog] to end. (18 sts)
Begin to stuff head; continuing to stuff as you go.
Rnd 13: [1dc, dc2tog] to end. (12 sts)
Rnd 14: [dc2tog] to end. (6 sts)
Fasten off with a sl st to the next st and using the yarn tail sew up the remaining six sts, weave in ends
Body:
Rnds 1—5: With Cyan Blue work as Head. (30sts)
Rnds 6 – 7: 1dc in each st around
Rnd 8: [1dc in the next three sts, dc2tog] to end. (24 sts)
Rnds 9 – 11: 1dc in each st around
Rnd 12: [1dc in the next two sts, dc2tog] to end. (18 sts)
Rnds 13 – 14: 1dc in each st around
Fasten off with a sl st to the next st, leave a long yarn tail for sewing head to the body. Stuff body.
Beak:
Beak is not stuffed;
Rnd 1: With Lemon make a magic ring, work 4dc into ring. (4 sts)
Rnd 2: 2dc in the first st, 1dc in the next 3sts (5 sts)
Rnd 3: 1dc in each st around
Rnd 4: 2dc in the first st, 1dc in the next 4sts (6sts)
Rnd 5: 1dc in each st around
Fasten off with a sl st to the next st, leave a long yarn tail for sewing beak to the head.
Wings:
Make 2. Wings are not stuffed;
Rnd 1: With Cyan Blue make a magic ring, work 5dc into ring. (5 sts)
Rnd 2: 1dc in each st around
Rnd 3: [2dc] to end. (10 sts)
Rnds 4-7: 1dc in each st around
Rnd 8: [1dc in the next three sts, dc2tog] to end. (8 sts)
Tail Feathers:
Make 3. Tail feathers are not stuffed;
Rnd 1: With Cyan Blue make a magic ring, work 6dc into ring. (6 sts)
Rnd 2: [1dc in the next two sts, 2dc] to end. (8 sts)
Rnds 3-8: 1dc in each st around
Rnd 9: [1dc in the next three sts, dc2tog] to end. (6 sts)
Making Up:
Attach the head to the body
Using black embroidery thread add an eye on either side of the head over rnds 5-7 approx 8 sts apart
Attach beak to the front of the head (in-between eyes) over rnds 6-8
Attach wings over rnds 10-11 on each side of the bird.
Attach the three tail feathers to the back of the body; two on rnd 6 and one above on rnd 7
Using the floral / jewellery wire fashion push the length through the bottom of the body of your bird (testing as you go to check the balance.
Fashion some bird feet at the end of each end of wire making sure your bird can stand without toppling over.
Wrap some lengths of Cyan yarn around the top of the leg and secure with a few stitches with your yarn needle to the body of your bird. You may wish to coat the yarn in a little PVC glue to stop it from slipping (optional).
So has the title of today’s free amigurumi made you want to break out into song?
Ba-be shark do do doo do do doo doo doo! Ba-be shark do do doo do do doo doo doo!
Sorry about that! It kind of had to be done! You can thank my toddler for today’s earworm! If you have no idea what I’m talking about and the phenomena that is the Pingfong Baby Shark Song has passed you by – lucky you! The baby shark song is now reportedly listed as one of the Top 40 most-viewed videos songs ever on YouTube – and my two year old LOVES it!
You may remember me saying that every year I try to crochet my girls a little something for Christmas; I made my (now eight) year old a giant narwhal (get the free pattern here) and so keeping with the oceanic theme it seemed only appropriate that I make Little Miss a baby shark.
I actually made the whole shark out of what was left of the one ball of Marriners plain Super Chunky (in Silver) that I used for the narwhals tusk – so if you bought the yarn for the giant narwhal then you should have enough left over to make this ami too.
Designed with embroidered features this ami is perfect for little ones under 36 months – for older children or adults you could use safety eyes instead.
The following pattern is free here on the blog but it’s also available in my Ravelry store where there is a nominal fee for a downloadable 3 page PDF pattern free of advertisements if you’d prefer.
Marriner Super Chunky (Silver – Yarn B) used in photos.
Pattern will work in other hooks and yarns though finished size will be different.
Hook: 6.5mm (US size K)
You will also need:
Stitch markers
A yarn needle
Polyester toy filler
Black yarn
Gauge: 7dc/sc = 8cm (3.1 inches)
Obtaining the correct gauge is not critical to this project but yarn amounts and finished size of projecy may differ if your gauge is different from mine.
Finished Size: 25cm (9.8 inches) from nose to tail
Abbreviations:
st(s) = stitch(es)
sl st = slip stitch
ch(s) = chain
dc/sc = UK double crochet / US single crochet
dc/sc2tog = UK double crochet 2 together / US single crochet 2 together
Stitch Guidance:
Slip Stitch (sl st): Insert hook in st indicated, yarn over and draw through all loops.
UK Double Crochet/US Single Crochet (dc/sc): Insert hook in st indicated and draw up a loop (two loops on hook), yarn over, draw through both loops on hook.
UK Double Crochet 2 together / US Single Crochet 2 together (dc/sc2tog):
Insert hook in st indicated and pull up a loop (two loops on hook), Insert hook in next st, yarn over, pull through three loops on hook.
Pattern Notes:
Using a stitch marker: Many parts of the narwhal are worked without joining in continuous rnds – place the stitch marker in the top of the first st to mark start of rnd.
Pattern:
Body:
Worked from tail to nose;
Rnd 1: Either make a magic ring (adjustable ring) to start or 2ch, work 6dc/sc into the ring / 2nd ch from hook, use tail yarn to tighten centre ring closed if necessary (6sts).
Rnd 2: * 1dc/sc, 2dc/sc in next st * repeat from * to * until the end of the rnd (9sts).
Rnd 3: * 1dc/sc in the next two sts, 2dc/sc in next st * repeat from * to * until the end of the rnd (12sts).
Rnd 4: * 1dc/sc in next three sts, 2dc/sc in next st * repeat from * to * until the end of the rnd (15sts).
Rnd 5: * 1dc/sc in next four sts, 2dc/sc in next st * repeat from * to * until the end of the rnd (18sts).
Rnd 6: * 1dc/sc in next five sts, 2dc/sc in next st * repeat from * to * until the end of the rnd (21sts).
Rnd 7: * 1dc/sc in next six sts, 2dc/sc in next st * repeat from * to * until the end of the rnd (24sts).
Rnd 8: * 1dc/sc in next seven sts, 2dc/sc in next st * repeat from * to * until the end of the rnd (27sts).
Rnd 9: * 1dc/sc in next eight sts, 2dc/sc in next st * repeat from * to * until the end of the rnd (30sts).
Rnds 10-14: 1dc/sc in each st until the end of the rnd.
Rnd 15: * 1dc/sc in the next eight sts, dc/sc2tog in next st * repeat from * to * until the end of the rnd (27sts).
Rnd 16: 1dc/sc in each st until the end of the rnd.
Rnd 17: * 1dc/sc in the next seven sts, dc/sc2tog in next st * repeat from * to * until the end of the rnd (24sts).
Rnd 18: 1dc/sc in each st until the end of the rnd.
Rnd 19: * 1dc/sc in the next six sts, dc/sc2tog in next st * repeat from * to * until the end of the rnd (21sts).
Rnd 20: * 1dc/sc in the next five sts, dc/sc2tog in next st * repeat from * to * until the end of the rnd (18sts).
Rnd 21: * 1dc/sc in the next four sts, dc/sc2tog in next st * repeat from * to * until the end of the rnd (15sts).
Rnd 22: * 1dc/sc in the next three sts, dc/sc2tog in next st * repeat from * to * until the end of the rnd (12sts).
Rnd 23: 1dc/sc in each st until the end of the rnd, fasten off but leave a long yarn tail.
Stuff the body
Then pressing rnd 23 sides closed sew together.
Side Fins (Make 2):
Rnd 1: Either make a magic ring (adjustable ring) to start or 2ch, work 5dc/sc into the ring / 2nd ch from hook, use tail yarn to tighten centre ring closed if necessary (5sts).
Rnd 2: 1dc/sc in each st until the end of the rnd.
Rnd 3: 1dc/sc in the next two sts, 2dc/sc in next st, 1dc/sc in the remaining two sts (6sts).
Rnd 4: 2dc/sc in the next two sts, 1dc/sc in the remaining four sts (8sts).
Rnd 5: 2dc/sc in the next four sts, 1dc/sc in the remaining four sts (12sts).
Rnd 6: 1dc/sc in each st until the end of the rnd, fasten off but leave a long yarn tail
Top Fin:
Rnd 1: Either make a magic ring (adjustable ring) to start or 2ch, work 4dc/sc into the ring / 2nd ch from hook, use tail yarn to tighten centre ring closed if necessary (4sts).
Rnd 2: * 1dc/sc, 2dc/sc in next st * repeat from * to * until the end of the rnd (6sts).
Rnd 3: * 1dc/sc in the next two sts, 2dc/sc in next st * repeat from * to * until the end of the rnd (8sts).
Rnd 4: * 1dc/sc in next three sts, 2dc/sc in next st * repeat from * to * until the end of the rnd (10sts).
Rnd 5: * 1dc/sc in next four sts, 2dc/sc in next st * repeat from * to * until the end of the rnd, fasten off but leave a long yarn tail (12sts).
Tail:
Rnd 1: Ch13; 1dc/sc in the second ch from the hook then 1dc/sc in each st until end, then working down the other side of the starting ch, 1dc/sc in each st. 24sts
Rnd 2: 1dc/sc in each st until the end of the rnd, fasten off but leave a long yarn tail
Then pressing rnd 2 sides closed sew together.
Making up:
With black thread embroider eyes on between rnds 18-19 approx 5sts apart
With black thread embroider three gills on rnds 13-15 on each side of the body
Attach the side fins (with the curve pointing backwards) on each side of the shark over rnds 10-16 approx 7sts apart
Attach top fin on top of shark over rnds 15-9
Attach the centre of the tail piece vertically onto rnd 1 of the body.